Why Does It Say Windows 7 When Backing Up System Image on Windows 10
Z7_3054ICK0KGTE30AQO5O3KA30N0
hp-concentra-wrapper-portlet
![]() Actions
Actions
HP PCs - Creating and Using a System Image to Restore Your Computer (Windows 7)
This document pertains to all HP and Compaq computers with Windows 7.
A system image is a copy of all data on a drive volume. If the hard drive fails or critical software files become corrupted, such as when a computer virus infects a system, You can restore all of your files the system image to return the contents of your computer. By default, a system image includes the drive(s) required for Windows to run. It includes Windows, your system settings, programs, and files. When restoring a computer from a system image, you cannot choose individual items to restore. All of your current programs, system settings, and files are replaced with the contents of the system image.
note:If you are only concerned about protecting your important files, use Windows Backup tool. Windows backup is faster and uses less space because it does not back up all data on the hard drive. For more information on using Windows Backup, see Backing Up Your Files in Windows 7.
Creating a system image in Windows 7
To create a system image backup for your computer, follow these steps:
-
Click Start
 , and then click Control Panel.
 -
Under System and Security, click Back up your computer.
The Backup and Restore Center opens.
-
Click Create a system image.
Figure : Creating a system image

Windows looks for available backup devices, such as a hard drive, DVD burning drive, or network drive.
-
Choose the location to save your system image, and then click Next.
-
On a hard disk
-
One or more DVDs
-
On a network location
warning:
Do not save the backup to the recovery partition: FACTORY_IMAGE or Recovery. Doing so corrupts the HP Recovery information.
-
-
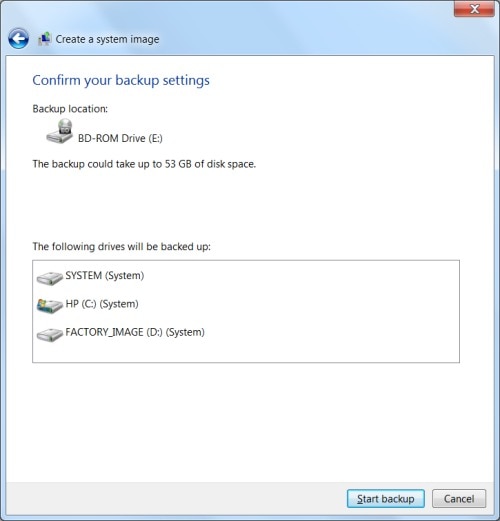
Confirm the settings, and then click Start backup.
note:
Make sure that you have enough blank space on the external drive or enough blank DVDs to create the system image.
Figure : Confirm your backup settings
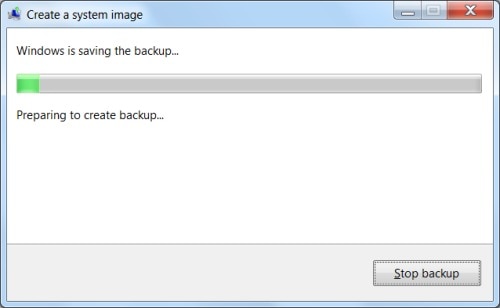
-
Windows prepares to create the system image.
Figure : Preparing to create the system image
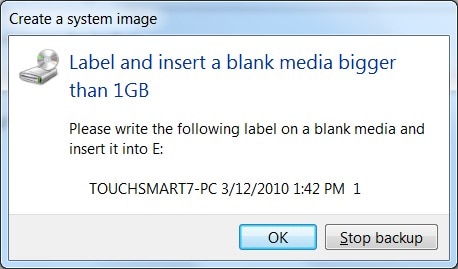
-
If you are backing up to DVD, label and insert a blank DVD in the DVD recorder.
Figure : Labeling and inserting blank media
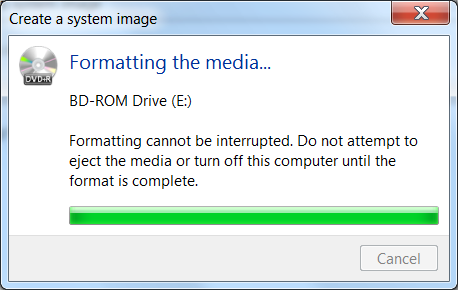
-
If you are backing up to DVD and a message displays requesting to format the DVD, choose to format the DVD.
Figure : Formatting the media
-
Windows saves the system image.
Figure : Saving the system image

-
If using DVDs, when prompted, label and insert a blank DVD. Continue to follow the on-screen instructions until the image is complete. This might take from several minutes to several hours. Store the backup in a safe place.
Restoring the computer from a system image in Windows 7
To replace all of your current programs, system settings, and files on a failed computer from a system image, use the following steps:
-
Click Start
, and then click Control Panel. -
Under System and Security, click Back up your computer.
The Backup and Restore Center opens.
-
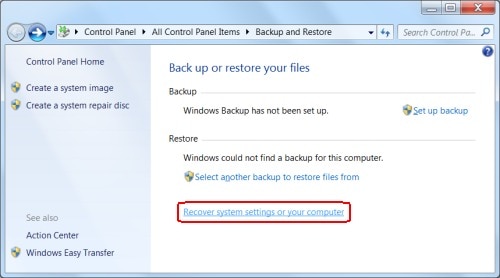
Click Recover system settings or your computer.
Figure : Backup and restore
-
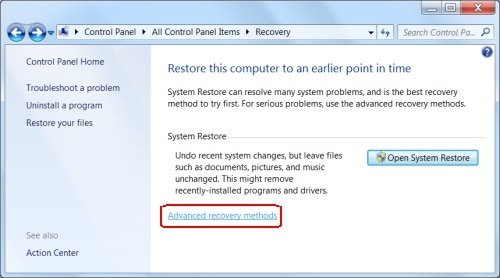
Under System Restore, click Advanced recovery methods.
Figure : Advanced recovery methods
-
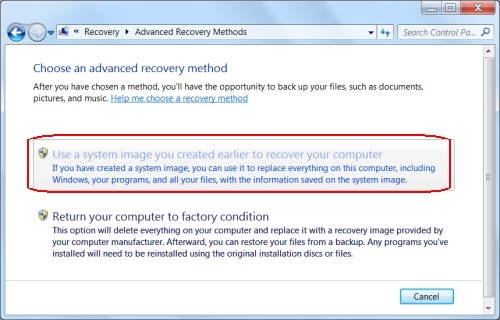
On the Advanced Recovery Methods page, click Use a system image you created earlier to recover your computer.
Figure : Restoring from a system image
-
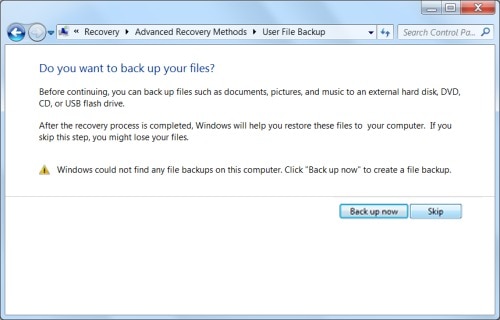
Before restoring from the system image, back up your files such as documents, pictures, and music to an external hard disk, DVD, CD, or USB flash drive. After the recovery process is complete, Windows prompts to restore these files.
If you have created any files since you created the system image disks, you should click Back up now to save copies of your recent files.
If you have a current back up of your files, click Skip.
Figure : Backing up your files
-
Click Restart to continue the recovery.
Figure : Restarting the computer

-
If the system image files are on a CD or DVD, insert the first CD or DVD into the disc drive.
If the files are on an external hard disk drive, connect the hard disk drive to the computer.
-
When Windows restarts, choose your keyboard input method, and then click Next.
note:
If your system image is saved on DVDs and Windows cannot find the system image file, remove the first disk in the set and insert the last disk in the set. Then click Retry.
-
Click Use the latest available system image (recommended), and then click Next.
-
On the Choose additional restore options page, click Next.
-
On the confirmation page, click Finish. Then click Yes. Windows begins to restore the computer.
-
If using DVDs, insert the requested disk when prompted, and then click OK. Follow the on-screen directions to completely restore the computer. This might take from a few minutes to a few hours. When Windows is finished restoring the computer, it automatically restarts.
-
If you created a user file backup before restoring the computer, you can restore those files now by clicking Restore my files, and following the on-screen instructions.
Why Does It Say Windows 7 When Backing Up System Image on Windows 10
Source: https://support.hp.com/id-en/document/c02053303
0 Response to "Why Does It Say Windows 7 When Backing Up System Image on Windows 10"
Post a Comment